|
Building a Windows 2000-Windows XP Dual-Boot System Friday, September 07, 2001 By
Greg Shultz (This article was originally published on the 8wire Web site and is reprinted on TheWinWiz with permission.) Chances are, you're thinking about eventually making
the move to Windows XP Professional. Before you decide to upgrade, however,
you'll probably want to experiment with the new operating system to see what
advantages it provides and to determine how well it interacts with your current
network setup. If so, you'll be glad to know that you can use Windows
XP Professional's built-in dual-boot configuration feature to boot both Windows
2000 and Windows XP on the same system. This allows you to experiment with the
new operating system without disrupting your current Windows 2000
configuration. In this article, I'll discuss the procedure from start
to finish that you'll use to install Windows XP Professional in a dual-boot
configuration on your existing Windows 2000 Professional system. I'll then show
you how to easily migrate your Windows 2000 Professional settings into Windows
XP Professional. Finally, I'll show you how to revert your dual-boot system
back to a single-boot system once you're done experimenting with Windows XP
Professional. Before You Start: Safety First!
While the technique I'll show you in this article is designed
to be safe, you never know when a problem could crop up. Therefore, I encourage
you to cover all your bases before you begin.
Once you've taken these steps, if anything does go
wrong, you can boot your system and restore all your settings and data. Creating the Windows 2000 setup disks
Making a hard disk backup and creating an Emergency
Repair Disk is probably something all of us can do in our sleep, so I won't go
into any detail on how to accomplish those tasks. However, since Windows 2000
doesn't come with a set of Setup disks, like Windows NT did, nor does it
require the creation of the Setup disks as part of the Windows 2000
installation procedure, chances are you don't have a set. As such, the
procedure for creating the Windows 2000 Setup disks is probably worth a brief
visit. Fortunately, the procedure is easy:
Adding a second hard disk vs. partitioning
When you're setting up a Windows-based dual-boot
configuration, you need to have each operating system installed on a separate
partition. This ensures that the installation procedure for the second
operating system doesn't overwrite crucial files belonging to the first
operating system. However, when setting up a Windows 2000 and Windows XP
dual-boot configuration, I recommend that you go one step further and keep each
operating system on a separate hard disk. Doing so not only allows you to keep
the operating systems separate but also allows you to avoid making drastic
changes to your existing hard disk. Installing a second hard disk is a relatively simple
procedure, and like most computer professionals, you probably have an old hard
disk lying around in a box of parts somewhere that will fill that bill. Windows
XP Professional's system requirements call for 1.5 GB of available hard disk
space. Even if you have to purchase a new hard disk, you can get your hands on
a good quality 20-30 GB hard disk for under $100. If you don't want to go the second hard disk route,
you can indeed repartition your hard disk and install Windows XP Professional
on the second partition. You can use a third-party partitioning utility,
such as PartitionMagic or Partition Commander, to repartition your existing
hard disk without disrupting your Windows 2000 Professional installation. Getting a performance boost
One advantage of putting each operating system on a
separate hard disk is that you can gain a dramatic performance boost by putting
each operating system's virtual memory paging file on the other hard disk. For
example, when you install Windows XP Professional on a second hard disk, you
can later specify the first hard disk as the location for the virtual memory
paging file. The performance boost comes from the fact that while one hard disk
is handling operating system functions, the other hard disk can simultaneously
handle paging file requests. In this case, two hard disks really are better
than one! Choosing a file system
Another thing you'll want to take into account before
you start is the file system you'll use for the Windows XP Professional
installation. Of course, you'll want to use the same file system for both
operating systems so that you can share data and applications. Fortunately,
Windows XP Professional supports the same three file systems - FAT16, FAT32,
and NTFS - that Windows 2000 Professional does. As such, if you're using NTFS
on your Windows 2000 Professional installation, you can install Windows XP
Professional with NTFS and not have to worry about compatibility problems. Creating a boot files backup
When you install Windows XP Professional on your
Windows 2000 Professional system in a dual-boot configuration, the Windows XP
Professional installation procedure will overwrite the Windows 2000
Professional boot files with its own so that it can control the dual-boot
operation. While you're evaluating Windows XP Professional this is fine.
However, at some point, you'll probably want to remove Windows XP Professional
and return to using Windows 2000 Professional. You'll therefore need a way to remove Windows XP
Professional's boot files and restore Windows 2000 Professional's boot files.
You can accomplish this by making a backup of Windows 2000 Professional's boot
files before you install Windows XP Professional. To do so, simply format a
floppy disk as you normally would. Then copy the following files from the root
directory to the floppy disk:
Now label this disk Windows 2000 Professional Boot
Files and store it in a safe place. Installing Windows XP Professional
Installing Windows XP Professional in a dual-boot
configuration is a fairly straightforward process. However, there are some
tricks along the way that you'll want to be familiar before you perform the
operation. Let's take a look. You'll perform the installation from within Windows
2000 Professional, so you can begin by placing the Windows XP Professional CD
in the drive and beginning the installation procedure as you normally would.
When you see the Welcome to Windows Setup page, you'll need to select the New
Installation (Advanced) option in the Installation Type dropdown list box, as
shown in Figure 1, and click Next.
After you enter your Product Key and click Next,
you'll see the Setup Options screen; click the Advanced Options button. Then,
in the Advanced Options dialog box, select "I Want To Choose The Install
Drive Letter And Partition During Setup," as shown in Figure 2, and click
OK.
You'll now progress through the installation procedure
until you arrive at the screen in the character-based portion of Setup that
shows the existing partitions on your computer. You'll then select the second
hard disk that you installed in your system as the location for Windows XP
Professional. From this point on, the installation procedure is
pretty clear-cut and you'll progress through it as you normally would. When the
installation is complete, you'll be able to boot into either Windows 2000
Professional or Windows XP Professional by choosing the appropriate item on the
boot menu. Note: If your system is connected to a Windows 2000
domain, you must use a different computer name for your Windows XP Professional
installation than you're using for your Windows 2000 Professional installation.
This is because each system participating in a Windows 2000 domain must have a
unique security identifier (SID) and as such must have a unique computer name.
For example, if you're computer is named Dragon in your Windows 2000
Professional installation, you might name it Dragon-XP in your Windows XP
Professional installation. Taking advantage of the File and Settings Transfer wizard
When you're experimenting with Windows XP
Professional, chances are you'll want to continue working as you normally
would. For example, you'll probably want to be able to connect to specific
mapped drives and printers on your network, take a look at your favorite Web
sites, or check your email. Fortunately, you won't have to manually reconfigure
all the settings necessary to continue your work in Windows XP Professional.
Instead, you can take advantage of Windows XP's File and Settings Transfer
Wizard. While this new tool is designed to migrate your configuration settings
and files from an old computer to a new Windows XP system, it also works for
migrating files and settings from one drive to another in a dual-boot
configuration. To use the File and Settings Transfer Wizard, boot
your system into Windows 2000 Professional. Then insert the Windows XP
Professional CD into the drive. When you see the "Welcome to Microsoft
Windows XP" screen, select the Perform Additional Tasks button. On the
next screen, select the Transfer Files and Settings button to launch the File
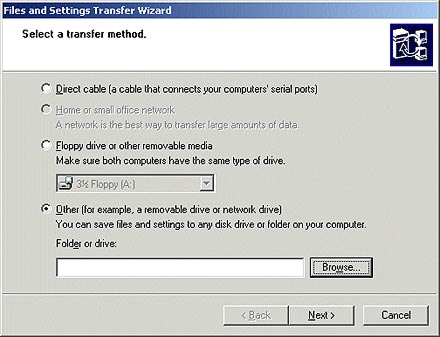
and Settings Transfer Wizard. When you see the Select a Transfer Method page, as
shown in Figure 3, select the Other option, click the Browse button, and choose
a folder on the Windows 2000 Professional drive in which to save your files and
settings. You'll then follow through with the rest of the wizard and choose the
files and settings that you want to migrate to Windows XP Professional.
Once you complete the File and Settings Transfer
Wizard on your Windows 2000 Professional installation, boot your system into
Windows XP Professional. You'll now launch the File and Settings Transfer
Wizard from the Start menu and begin the process of importing your files and
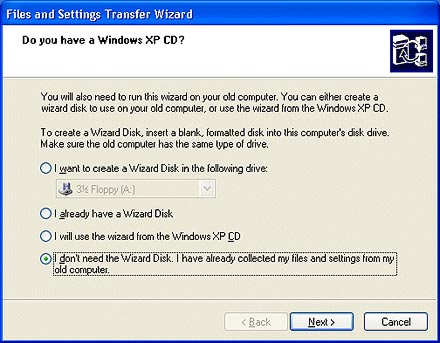
settings into Windows XP Professional. As you run the wizard you'll be asked to specify which
computer you're running the wizard on. Of course, you'll select the New
Computer option. When the wizard prompts you for the Windows XP CD,
just select "I Don't Need The Wizard Disk," as shown in Figure 4, and
then click Next. When you do, you'll be prompted specify the location of the
file and setting items.
Once the wizard imports the file and setting items
into Windows XP Professional, you'll be prompted to log off the system. When
you log back on, you'll find that Windows XP Professional now contains all the
files and settings you chose to migrate from your Windows 2000 Professional
installation. For example, if you're using Outlook Express, you'll find that
all your mail folders, your Address Book, and configuration settings have been
installed in Windows XP Professional's version of Outlook Express. Installing your Applications
When it comes to installing your applications in Windows
XP Professional, you have two choices. You can perform completely new
installations on the second hard disk or you can simply reinstall the
applications in the same folders on the first hard disk. When you go with the latter method, the installation
procedure will be treated by the application as a simple reinstallation and
shouldn't cause any problems in Windows 2000.
On the other hand, if you aren't sure whether a
particular application is completely Windows XP compatible, I'd recommend
performing a new installation on the second hard disk. That way there will be
no chance of any file corruption or other mishaps as you experiment with
Windows XP. Undoing the Dual-Boot Configuration
At some point, you may to want to remove the Windows
XP Professional dual-boot configuration and return to a single-boot Windows
2000 Professional setup. Fortunately, there's a way to undo this dual-boot
configuration - it's a bit convoluted, but it works like a charm. To begin, insert the Windows 2000 Professional CD into
the drive and hold down the Shift key to prevent Autostart from launching
Setup. Next, insert the Windows 2000 Setup Boot Disk 1 into the floppy drive
and reboot your system. When the system reboots allow it to launch Setup
normally. Successively insert the other Windows 2000 Setup disks as you're
prompted. Once the fourth disk finishes loading, you'll see the
Windows 2000 Professional Setup menu containing the following items:
To continue, choose the repair option by typing R. The next screen will prompt you to choose either the
Recovery Console or the Emergency Repair Disk to perform the repair operation.
To continue, choose the Recovery Console option by typing C. As soon as you do,
your screen will go black - but don't panic. In a moment you'll see the Microsoft Windows 2000
Recovery Console screen and will be prompted to choose which Windows
installation you want to log into. You'll choose drive C, which is the drive
containing Windows 2000 Professional. You'll now be prompted to type in the
Administrator password for that drive. When you do so, you'll be logged into
that drive and will see a C: prompt. At this point, insert the Windows 2000 Professional
Boot Files disk you made earlier into the floppy disk drive. Now, use the Copy
command to copy the three boot files from the floppy disk to the root directory
of drive C. When you do, you'll overwrite the Windows XP Professional versions.
Unfortunately, the Recovery Console's Copy command won't allow you to use
wildcards, so you'll have to copy each file individually. Once you finishing copying the files, remove Windows
2000 Professional Boot Files disk and type Exit at the command prompt. Doing so
will automatically reboot your system. When your system restarts, Windows 2000 Professional will be the only bootable operating system. You can then either reformat second hard disk from within the Disk Management console or remove it.
|